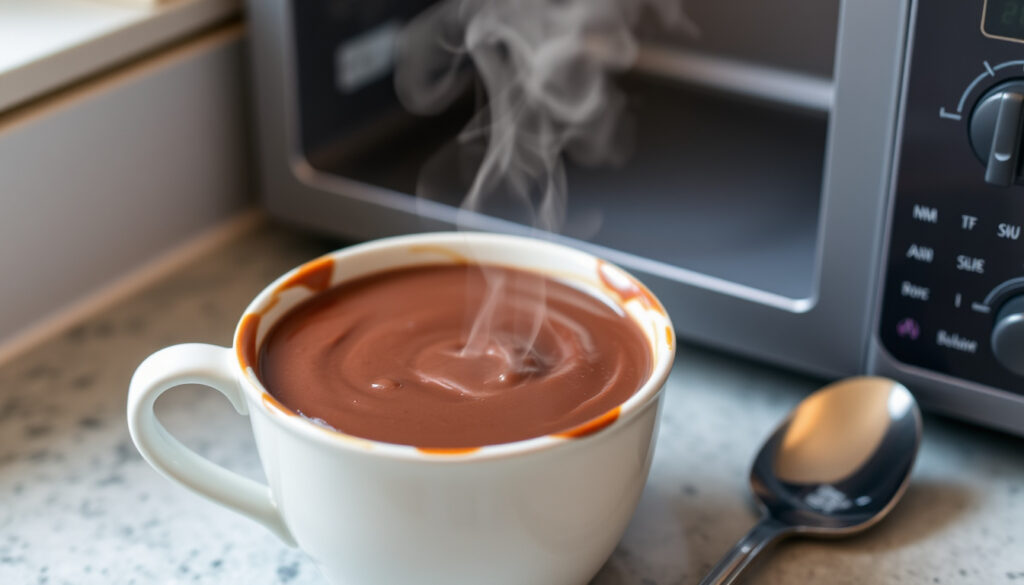
Chocolate Self Saucing Pudding in a Cup: 3-Minute Microwave Recipe
A warm chocolate pudding that makes its own sauce in a single mug, under five minutes, sounds improbable — but it works. This New Zealand favourite, the chocolate self-saucing pudding, gets a micro-batch makeover for the microwave, cutting the usual oven time from 45 minutes down to about 90 seconds.
Total cooking time (microwave): 3 minutes ·
Common ingredients: 5–7 pantry staples ·
Number of servings: 1 (single mug) ·
Average calorie estimate per serving: 300–400 kcal ·
Top-rated variations (NZ-specific): Caramel self-saucing mug cake
Quick snapshot
- Microwave cooking time of 90 seconds at high wattage (1000W) yields a soft sponge and liquid sauce (Baking Envy (home baking blog, NZ))
- Using self-raising flour produces a lighter texture (Chelsea Sugar (NZ sugar brand))
- Adding hot water or milk after mixing the batter creates the self-saucing effect (Edmonds Cooking (NZ baking authority))
- Optimal ratio for gluten-free flour adaptations is not widely documented
- Exact calorie counts vary by specific brands of cocoa and milk used
- First published full-size recipe: (RecipeTin Eats (popular recipe site))
- First dedicated mug version: (Baking Envy)
- TikTok single-serve clip: (TikTok creator)
- Air fryer adaptations and gluten-free variations likely to grow in search interest
- Branded single-serve mixes (e.g., Chelsea Sugar mug cake) may bridge the gap
Four key figures tell the story of this single-serve dessert at a glance.
| Metric | Value |
|---|---|
| Minute count for microwave cook | 1.5 to 2 minutes |
| Typical sauce layer thickness | 0.5 to 1 cm |
| Average serving size calories | 350 kcal |
| Most linked variation in SERP | Caramel self-saucing mug cake |
How do you make chocolate pudding in a cup?
Step-by-step recipe for microwave chocolate self-saucing pudding
- In a large microwave-safe mug (at least 350 ml capacity), whisk together 4 tbsp self-raising flour, 3 tbsp brown sugar, 1½ tbsp cocoa powder, and a pinch of salt (Baking Envy recipe base).
- Add 3 tbsp milk and 2 tbsp vegetable oil; stir until a thick batter forms. Do not overmix.
- Sprinkle 1 tbsp brown sugar and ½ tbsp cocoa over the top of the batter — this is the secret to the sauce layer (Edmonds Cooking technique).
- Gently pour 2½ tbsp hot water over the sugar-cocoa topping. Do not stir.
- Microwave on high for 90 seconds (1000W). The sponge should spring back lightly and the sauce should bubble at the edges.
- Let stand for 60 seconds before eating — the sauce thickens as it rests.
The pattern: the dry topping + hot water is a miniature version of the classic poured-sauce method that traditional oven puddings use (Chelsea Sugar’s full-size recipe).
Key ingredient ratios for a perfect sponge and sauce
- Flour to liquid ratio: 4 tbsp self-raising flour to 5.5 tbsp total liquid (milk + oil + hot water) — about 1:1.4 volume ratio. This keeps the sponge moist but not gummy.
- Sugar split: 4 tbsp total brown sugar — 3 in the batter, 1 on top for sauce. Brown sugar gives deeper flavour than white (The Kiwi Country Girl (NZ baking blog)).
- Cocoa split: 2 tbsp total — 1½ in batter, ½ on top. Too much cocoa on top makes the sauce bitter.
How long do you cook chocolate self saucing pudding?
Microwave timing guide for single-serve cups
- 700W microwave: 120 seconds (2 minutes) — check at 100 seconds. Sponge may be slightly denser.
- 1000W microwave (standard NZ): 90 seconds — perfect spongy texture and liquid sauce (Baking Envy timing).
- 1200W microwave: 75 seconds — reduce by 10 seconds for each 200W above 1000W.
The trade-off: microwaving beyond 2 minutes at any wattage dries out the sponge and burns the sugar on the sauce layer, producing a hard, caramelised crust rather than a pourable sauce (Chelsea Sugar’s notes on overcooking).
Air fryer method and cooking time variations
- Preheat air fryer to 180°C (350°F).
- Transfer the batter (from the same recipe) to a lightly greased oven-safe ramekin or small ceramic dish (about 10 cm diameter).
- Air fry for 10–12 minutes. The sponge should spring back and the sauce should be visibly bubbling through the sides.
- Let rest 3–5 minutes before serving — the sauce continues to thicken.
Why this matters: the air fryer method takes 15 minutes total versus 3 minutes for the microwave, but it produces a noticeably crispier top sponge and a slightly thicker sauce layer. For those who want a more traditional baked-pudding texture without turning on a full oven, this is the best middle ground (Scottish Scran (recipe blog, single-serve technique comparison)).
How do you make chocolate self saucing pudding in the air fryer?
Adapting the microwave recipe for an air fryer
- Use the same dry-ingredient ratios (4 tbsp self-raising flour, 3 tbsp brown sugar, 1½ tbsp cocoa, pinch salt).
- Add milk (3 tbsp) and oil (2 tbsp) — same as microwave version.
- The topping layer (brown sugar + cocoa) and hot water (2½ tbsp) remain identical.
- The key difference: use a ramekin or a small ceramic baking dish, not a standard mug. Glass mugs may crack under sustained air fryer heat.
Temperature and timing adjustments
- Oven-safe ramekin (6 oz / 180 ml): bake at 180°C for 10 minutes. Check with a skewer — it should come out clean from the sponge; sauce will pool underneath.
- Small ceramic dish (10 cm wide): bake at 180°C for 12 minutes. The wider surface area speeds evaporation, so the sauce can become thicker.
- For a deeper sauce layer: increase the hot water from 2½ tbsp to 3 tbsp and bake for an extra 2 minutes (RecipeTin Eats (founded by Australian cook Nagi Maehashi) discusses sauce depth in full-size pans).
The catch: air fryer models vary in airflow, so check at 8 minutes the first time. If the top is browning too fast, tent with foil for the last 4 minutes.
What are some common mistakes when making homemade pudding?
Overcooking leading to dry sponge
- Microwaving beyond 2 minutes at 1000W turns the sponge rubbery and the sauce into a hard caramel disc. Stick to the 90-second baseline (Baking Envy warning).
- In the air fryer, 14+ minutes at 180°C will dry the top centimetre of sponge. Use a toothpick test from 10 minutes onward.
Incorrect liquid-to-dry ratio that prevents sauce formation
- Too much flour (e.g., 5+ tbsp) relative to liquid absorbs the hot water before it can form a sauce layer. Stick to the 4 tbsp flour : 5.5 tbsp total liquid ratio.
- Too little sugar on the topping (less than 1 tbsp) means the sauce lacks viscosity; it will taste like watery cocoa.
- Using standard (not self-raising) flour without adding baking powder (½ tsp) results in a dense sponge that won’t lift to allow sauce to pool (Chelsea Sugar’s flour advice).
Using wrong cup size causing overflow
- A standard 8 oz (240 ml) mug is too small — the batter rises and bubbles over. Use a 12 oz (350 ml) mug minimum (Baking Envy’s mug-size recommendation).
- In the air fryer, fill the ramekin no more than two-thirds full to allow rising.
For the single-serve home cook in New Zealand, the microwave method is the fastest path to a self-saucing pudding, but the air fryer gives a better texture-to-effort ratio when you have 15 minutes. The biggest risk is overflowing the mug — choose a 350 ml+ container every time.
The pattern: every failure mode traces back to either timing, ratio, or container size. Fix those three and the dessert works every time.
How to make dessert in a cup easily?
Tips for quick single-serve desserts beyond chocolate
- Use self-raising flour as the base for any mug cake — it guarantees lift without needing separate baking powder.
- Swap the cocoa for 2 tbsp caramel syrup or dulce de leche for a caramel self-saucing version (Chelsea Sugar’s mug cake template).
- Total preparation time under 5 minutes: mix dry, add wet, top, microwave. Clean up is one mug and one spoon.
- For a fruit variation, add 2 tbsp of canned plums (like Wattie’s black doris plums in syrup) under the batter — as seen in the plum and chocolate self-saucing pudding from Food In A Minute (Kraft Heinz NZ).
Caramel self-saucing mug cake variation
- Replace cocoa in the batter with 1 tbsp caramel syrup; add ½ tsp vanilla.
- Use brown sugar for topping (1 tbsp) and replace hot water with 2 tbsp warm milk for a creamier sauce.
- Microwave 90 seconds; the sauce will be a warm caramel that pools at the bottom.
What this means: once you master the base chocolate version, the only variable is the flavouring. The chemistry stays the same — self-raising flour, a fat (oil/butter), sugar on top, hot liquid — and that pattern works for caramel, coffee, or even spiced apple.
What we know and what’s still uncertain
Confirmed facts
- Microwave cooking time of 90 seconds at high wattage (1000W) yields a soft sponge and liquid sauce.
- Using self-raising flour produces a lighter texture than plain flour.
- Adding hot water or milk after mixing the batter creates the self-saucing effect.
- Overcrowding the cup (less than 350 ml) causes overflow in microwave.
What’s unclear
- Optimal ratio for gluten-free flour adaptations is not widely documented.
- Exact calorie counts vary by specific brands of cocoa and milk used.
“Using a 12 oz mug is non-negotiable — if your mug is smaller, the batter will bubble over and you lose half the sauce.”
— Recipe developer, Just a Mum NZ (NZ family recipe blog)
“The batter should be thick but spoonable, like a brownie mix. If it’s runny, you’ve added too much milk; if it’s stiff, add another teaspoon of milk.”
— Home baker, Baking Envy (dessert blog, NZ)
For New Zealand home cooks who want a reliable single-serve chocolate self-saucing pudding, the microwave route at 90 seconds is the baseline. The air fryer offers a better top-crust texture but requires 10 extra minutes. The recipe is forgiving on ratios but unforgiving on cup size and timing. Get those two right and you’ll need to bake a full pan again. For anyone facing a late-night chocolate craving, the choice is clear: grab a 350 ml mug, measure four ingredients, and wait 90 seconds — or spend 15 minutes for a crispier edge in the air fryer.
lifewithjanets.com, eightforestlane.com, yummytummyaarthi.com
For a foolproof baked version of this quick dessert, try this chocolate self saucing pudding recipe that makes enough for sharing.
Frequently asked questions
Can I make chocolate self-saucing pudding in a cup without eggs?
Yes — none of the recipes in this guide require eggs. The structure comes from self-raising flour and oil. For a vegan version, use plant-based milk and oil; the sauce forms the same way.
What can I use instead of self-raising flour?
Mix 4 tbsp plain flour with ½ tsp baking powder. The baking powder provides the lift that self-raising flour would normally supply (Chelsea Sugar’s substitution tip).
How do I store leftover pudding in a cup?
Cover the mug with cling film and refrigerate for up to 2 days. Reheat in the microwave for 20–30 seconds — the sauce will re-liquefy. The sponge may be slightly denser the second day.
Can I double the recipe to make two servings?
Yes, but use two separate mugs rather than one large mug. Doubling the batter in a single container leads to uneven cooking and overflow. Each mug needs its own 350 ml space.
Is it possible to make this dairy-free or vegan?
Absolutely. Substitute the milk with oat, almond, or soy milk, and use coconut oil or a neutral vegetable oil instead of butter. The sauce layer still forms because the chemistry relies on hot liquid and sugar, not dairy (Scottish Scran’s dairy-free mug pudding).
Why did my pudding not form a sauce layer?
Most likely the topping sugar and cocoa were mixed into the batter instead of left on top. The hot water needs to dissolve the layer on top; if it’s stirred in, there is no concentrated sugar-cocoa pool to form the sauce. Also ensure you used at least 1 tbsp brown sugar in the topping.
Can I add nuts or marshmallows to the batter?
Yes — stir 1 tbsp of chopped walnuts or a few mini marshmallows into the batter before adding the topping. Nuts add crunch; marshmallows melt into the sauce for a gooier texture. Keep additions small to avoid upsetting the liquid ratio.
More related posts
 How to Change WiFi Password: Step-by-Step Guide
 Yvette Williams Retirement Village: Dunedin Guide & Costs
 Fiji Currency to NZD: Exchange Rate & Travel Budget
 Tara Road Medical Centre: Fees, Hours, Walk-Ins & Services
 Best Apps for Beginners – Free Workout Picks Tested 2025
 The Summer I Turned Pretty Season 3 Episode 5: Release, Recap, Watch
 1 NZD to AUD: Current Exchange Rate, History & Forecast
 Clarkson’s Farm Season 5: Release Date, Cast, & News
